Not so long time ago we were at war, well, loudness war. Everybody was competing to sound louder than the others.
You may wonder, why people did such horrible things in the past?! Well, like in all wars, the ultimate goal was profit, money. Louder songs were perceived better. It was as simple as that.
Many brave people were fighting in this war, losing every day, but there was hope. Some really clever men started working on new technology, a technology that could end that all! It was very hard, but battle after battle we were closer and closer to the end. And one day, the end had come. It was over! We no longer needed to kill all dynamics in our music!
Musicians were living happily since then.
But, there was one villain, like in all stories, waiting to mess things around again…
After the introduction of loudness normalization on major streaming platforms, people realized that you no longer need to absolutely crush the dynamics in the song. That was a great thing, now we have an option to choose. Nowadays, almost every platform uses ITU BS 1770 standard to measure the loudness. You may know it as LUFS measurement.
I personally really like this, and my meter has influenced that move significantly by giving people an affordable or a free tool that you can use in your production compared to the very overpriced competition.
The LUFS measurement algorithm is really solid. It makes the job done really well, but like with all algorithms, if you study it enough, you will spot some loopholes.
And oh boy, I was looking at that thing for years! So, recently I was working on adding a relative gate visualization in Youlean Loudness Meter. (more on relative gate later)
While working, I got an idea. Could you manipulate the integrated loudness by knowing where exactly the relative gate is? After a few tests, it seems that you can actually do it! How amazing is that!
I may have already lost you with these terms, so let me explain it in a simple manner.
All platforms use integrated loudness to measure the loudness in a song.
You can think about integrated loudness like an average LUFS measurement of a song with a couple of tweaks.
One hidden tweak is that we are discarding everything that is less than -70 LUFS. So, very quiet measurements won’t be used for the averaging.
The other tweak is the 10 LUFS relative gate. That one is a bit complicated.
Everything below that gate will be discarded for averaging.
So, how can we know where exactly that gate is?
Fortunately, there is an easy way to do that in Youlean Loudness Meter 2.
Just click on the “G” button.

Once you turn this button on, you will see a horizontal orange line in the histogram that will represent the integrated relative gate.
Everything below the orange line will be discarded and everything above will be used for the integrated loudness calculation.

Now, let’s get back to how to hack the actual thing!
I will use a Deadmau5 – Some Chords song to teach you how to do it. I have chosen that song specifically because it will be easy to understand what is going on, but you can use any song of course.
If we analyze this song, we can see that it has -12.3 LUFS integrated loudness.
When uploaded on YouTube, this song will be normalized to -14 LUFS.
In order to achieve that, the overall loudness of the song will be lowered by 1.7 dB. ((-12.3) – (-14) = -1.7)
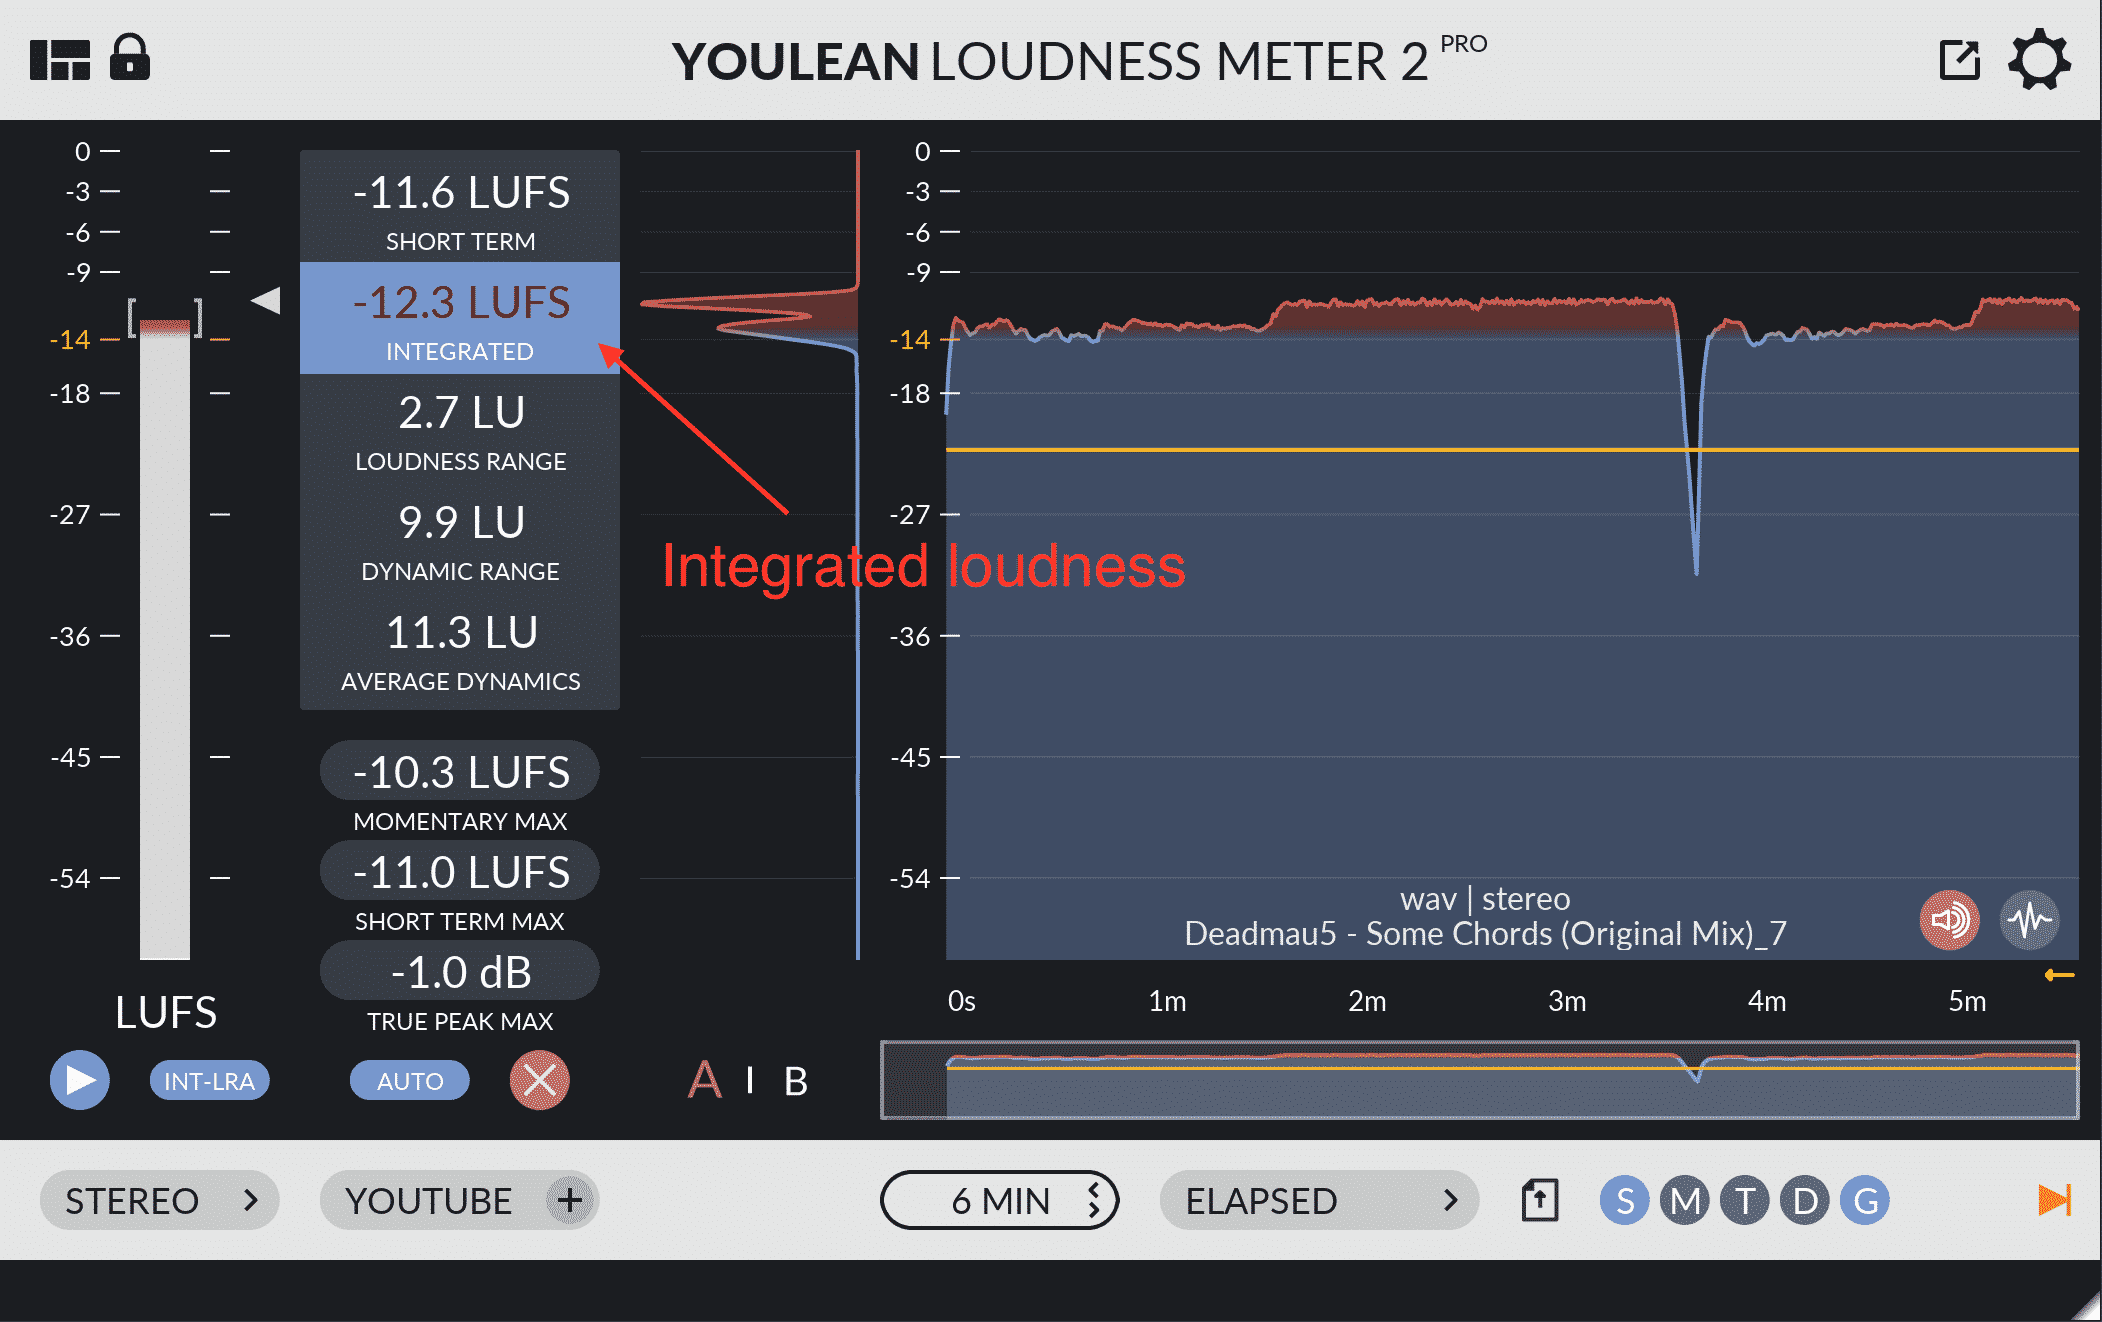
So, how to hack the integrated loudness?
Well, we want to keep our main part of the song or chorus in this case, as loud as possible, and we want to make other parts quieter, but not so quiet to go below the relative gate line.
Step by step guide:
1. Find where is the relative gate
For this you must analyze the song from start to finish. The relative gate will be moving a bit while you are hacking the loudness, so it will require some trial and error.
We can see that in this example the relative gate is around -22/-23 LUFS.
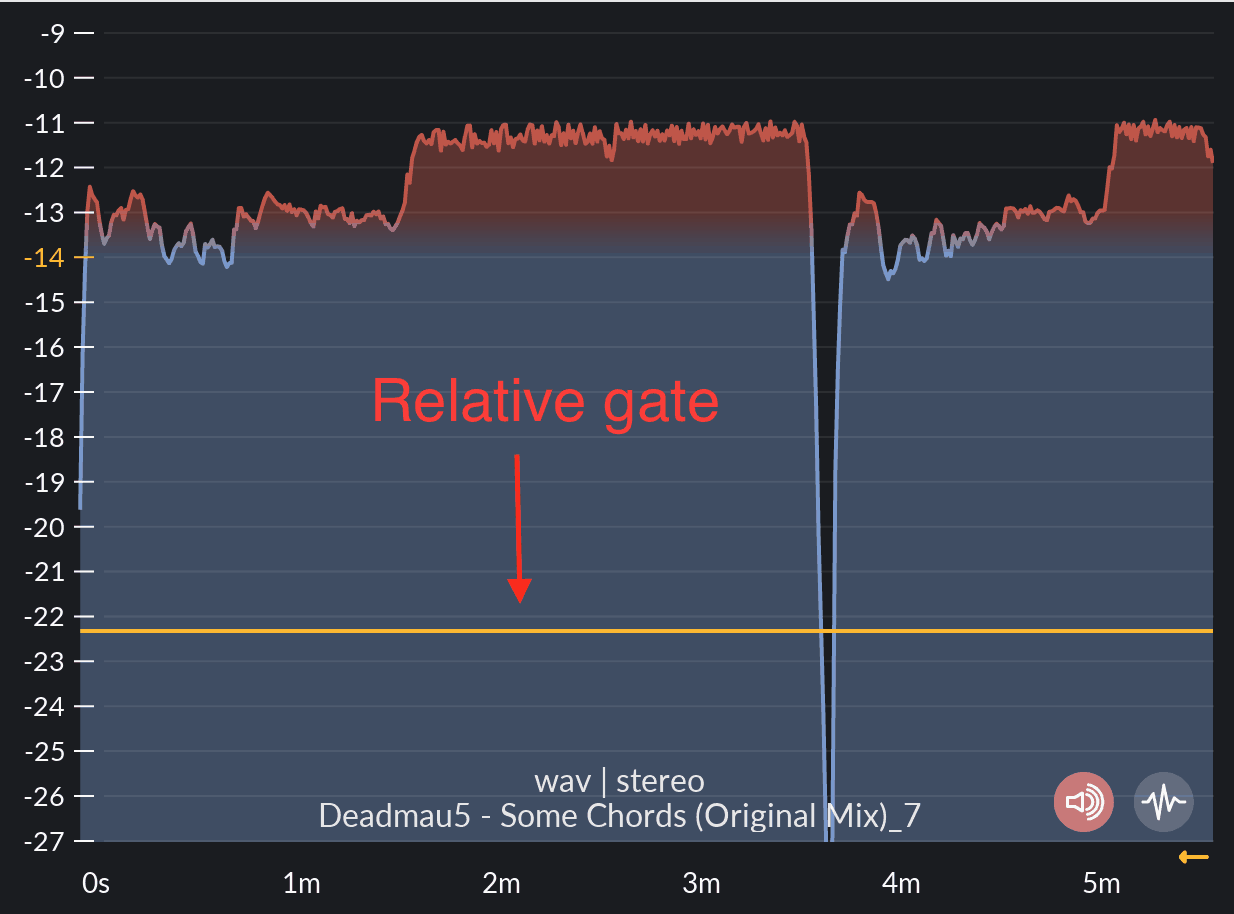
2. Find which part of the song we want to make quieter
This one will be a personal preference, but the bigger chunk you make quieter, the more pronounced the result will be.
Generally, we would leave the main part of the song, chorus, and make quieter the rest of the song.
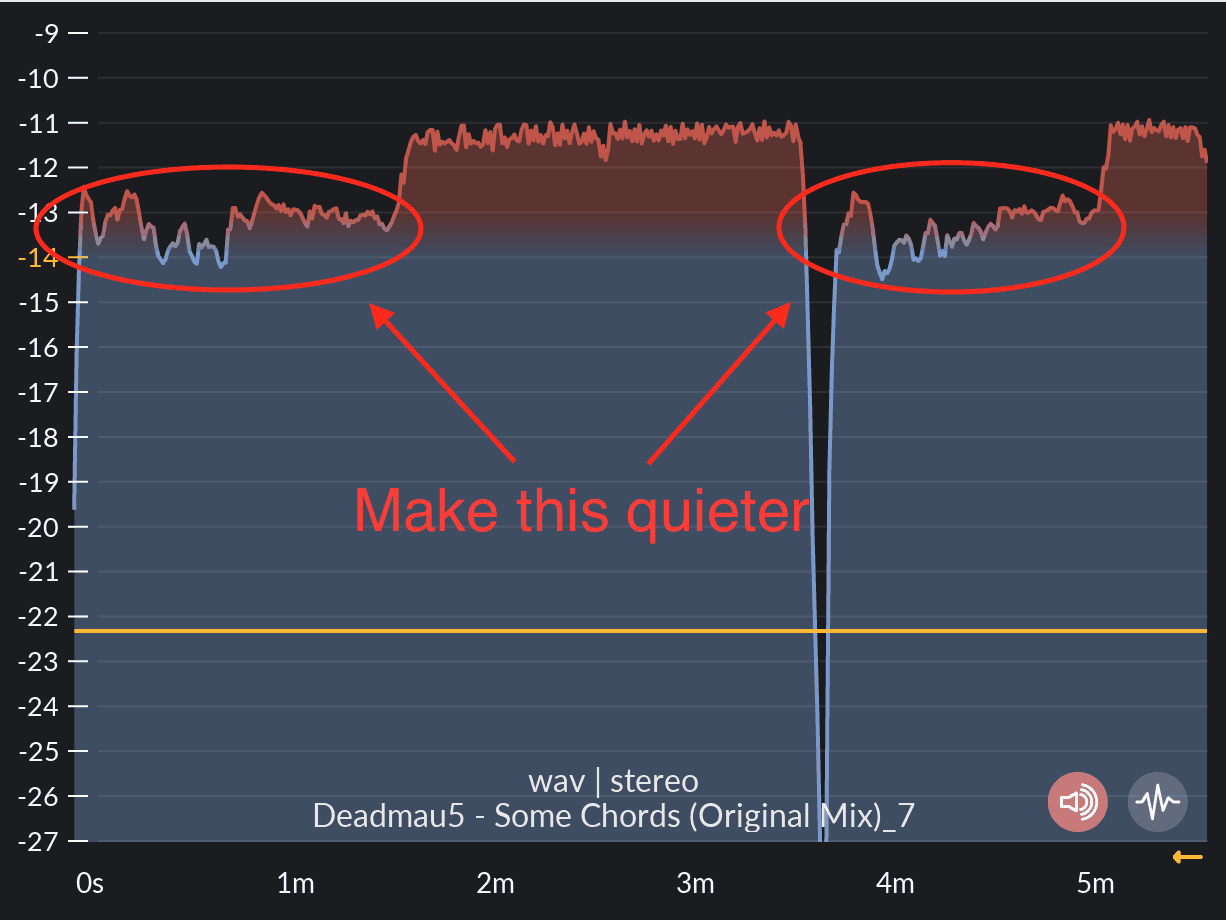
3. Find how much quieter do we want to make it
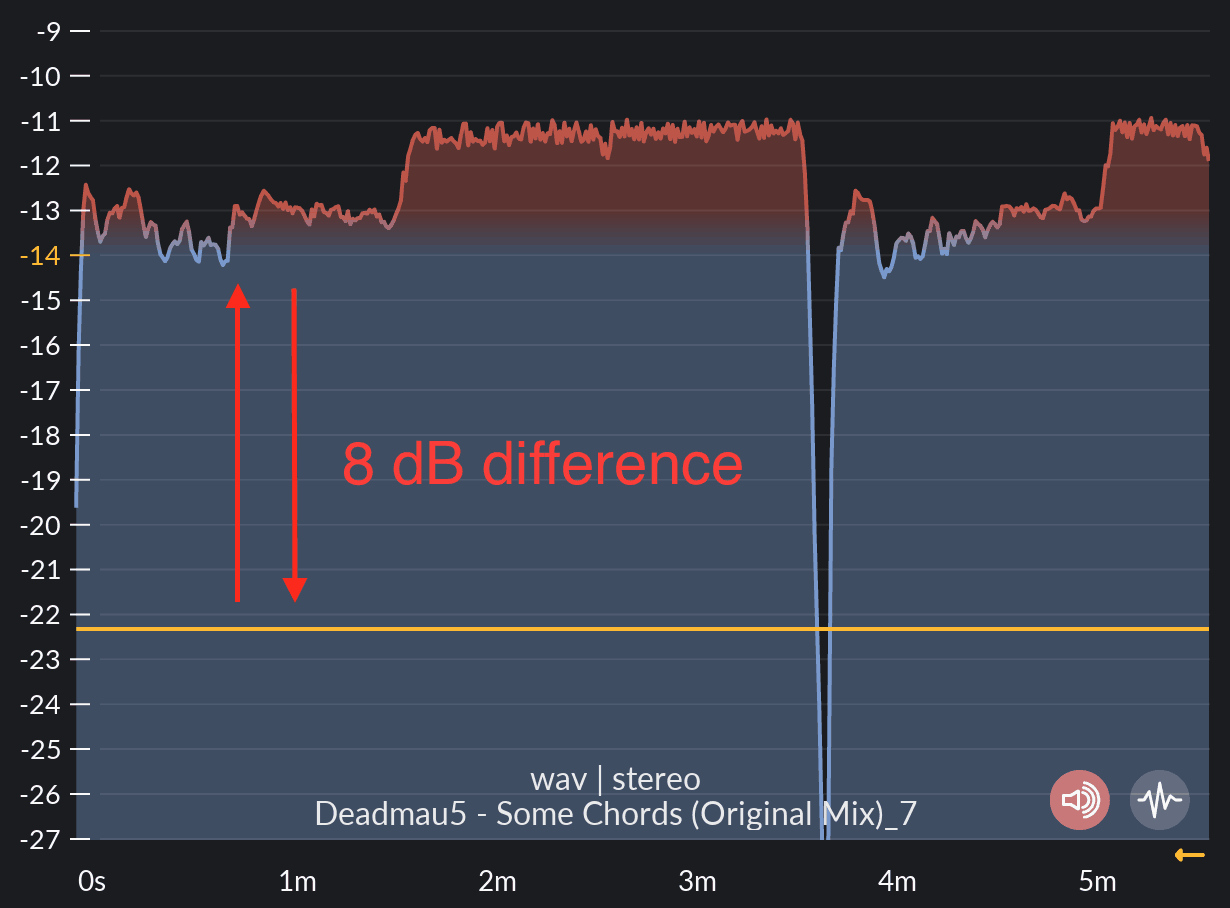
Since I am aiming for the biggest “hack”, I will make it as quiet as possible without going below the relative gate line.
In this song, verse parts are around -14 LUFS, and the relative gate is around -22 LUFS, so we will lower the volume by around 8 dB. ((-14) – (-22) = -8)
4. Now do trial and error with the relative gate
Since we have lowered the volume on some parts of the song, the relative gate will move down a bit.
You can see that it has moved to -24 LUFS, so we still have some room to make quiet parts even quieter.
Let’s go a couple of dB quieter!
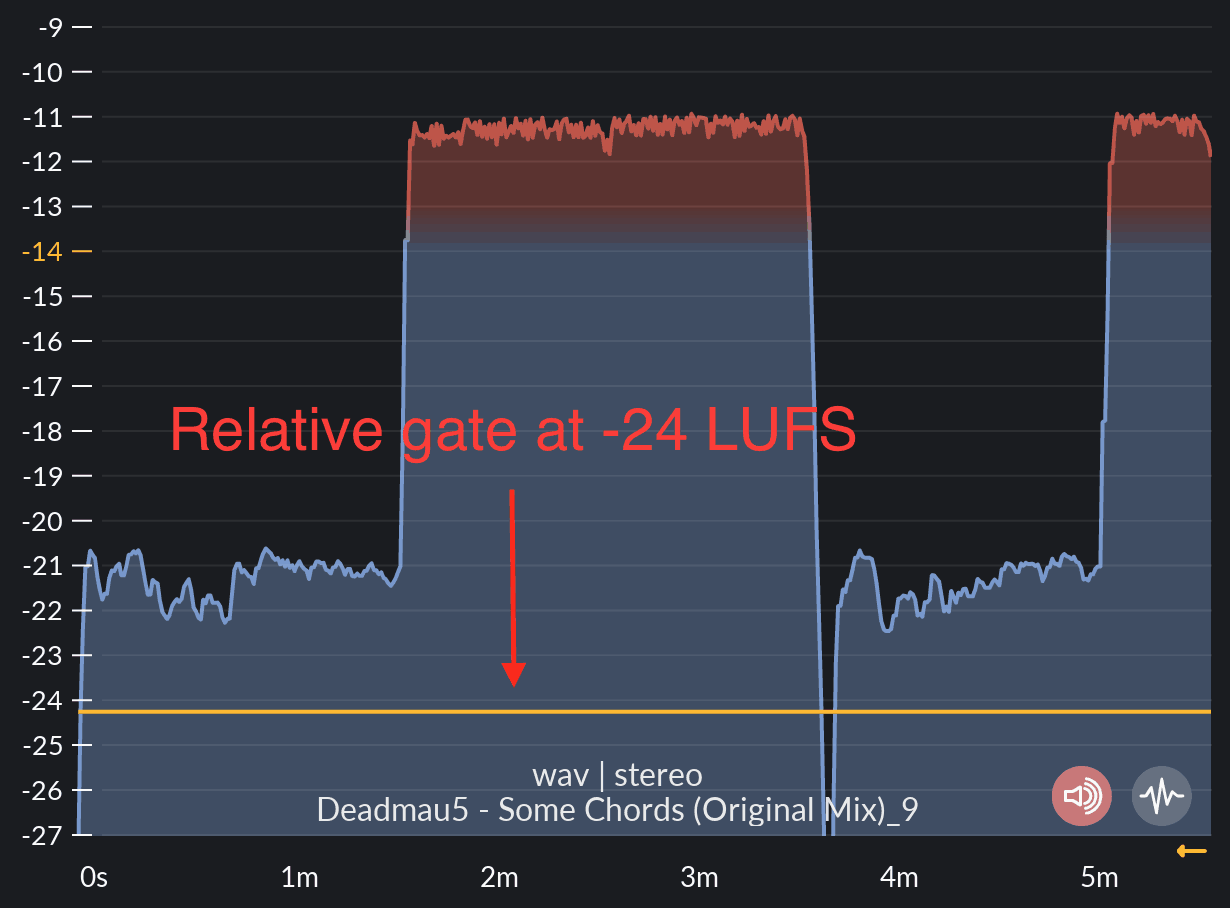
5. Done!
We have successfully “hacked” the LUFS algorithm.
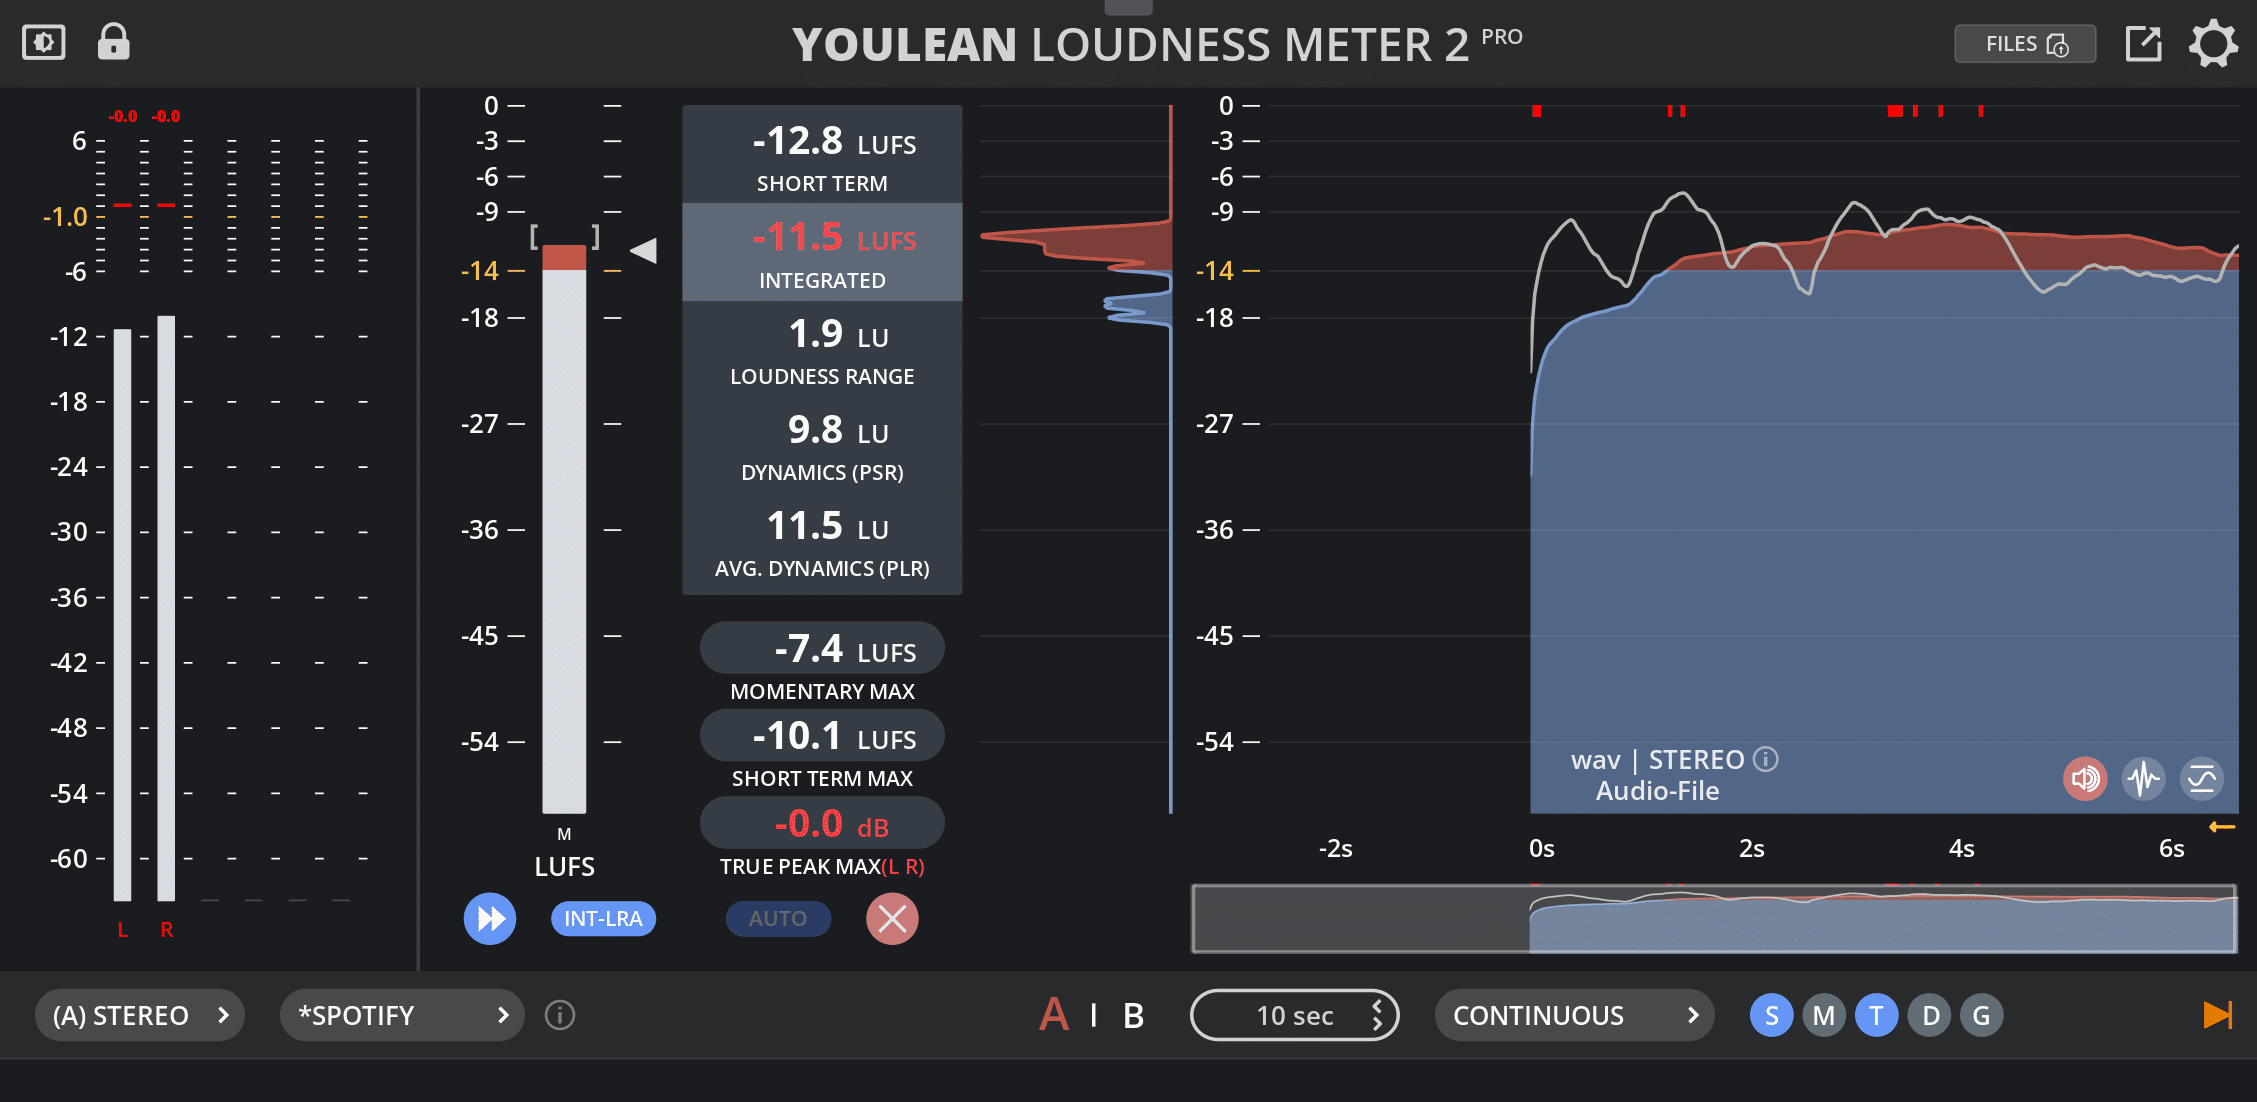
Integrated loudness went from -12.3 LUFS to -14.3 LUFS, without changing loudness of the chorus!
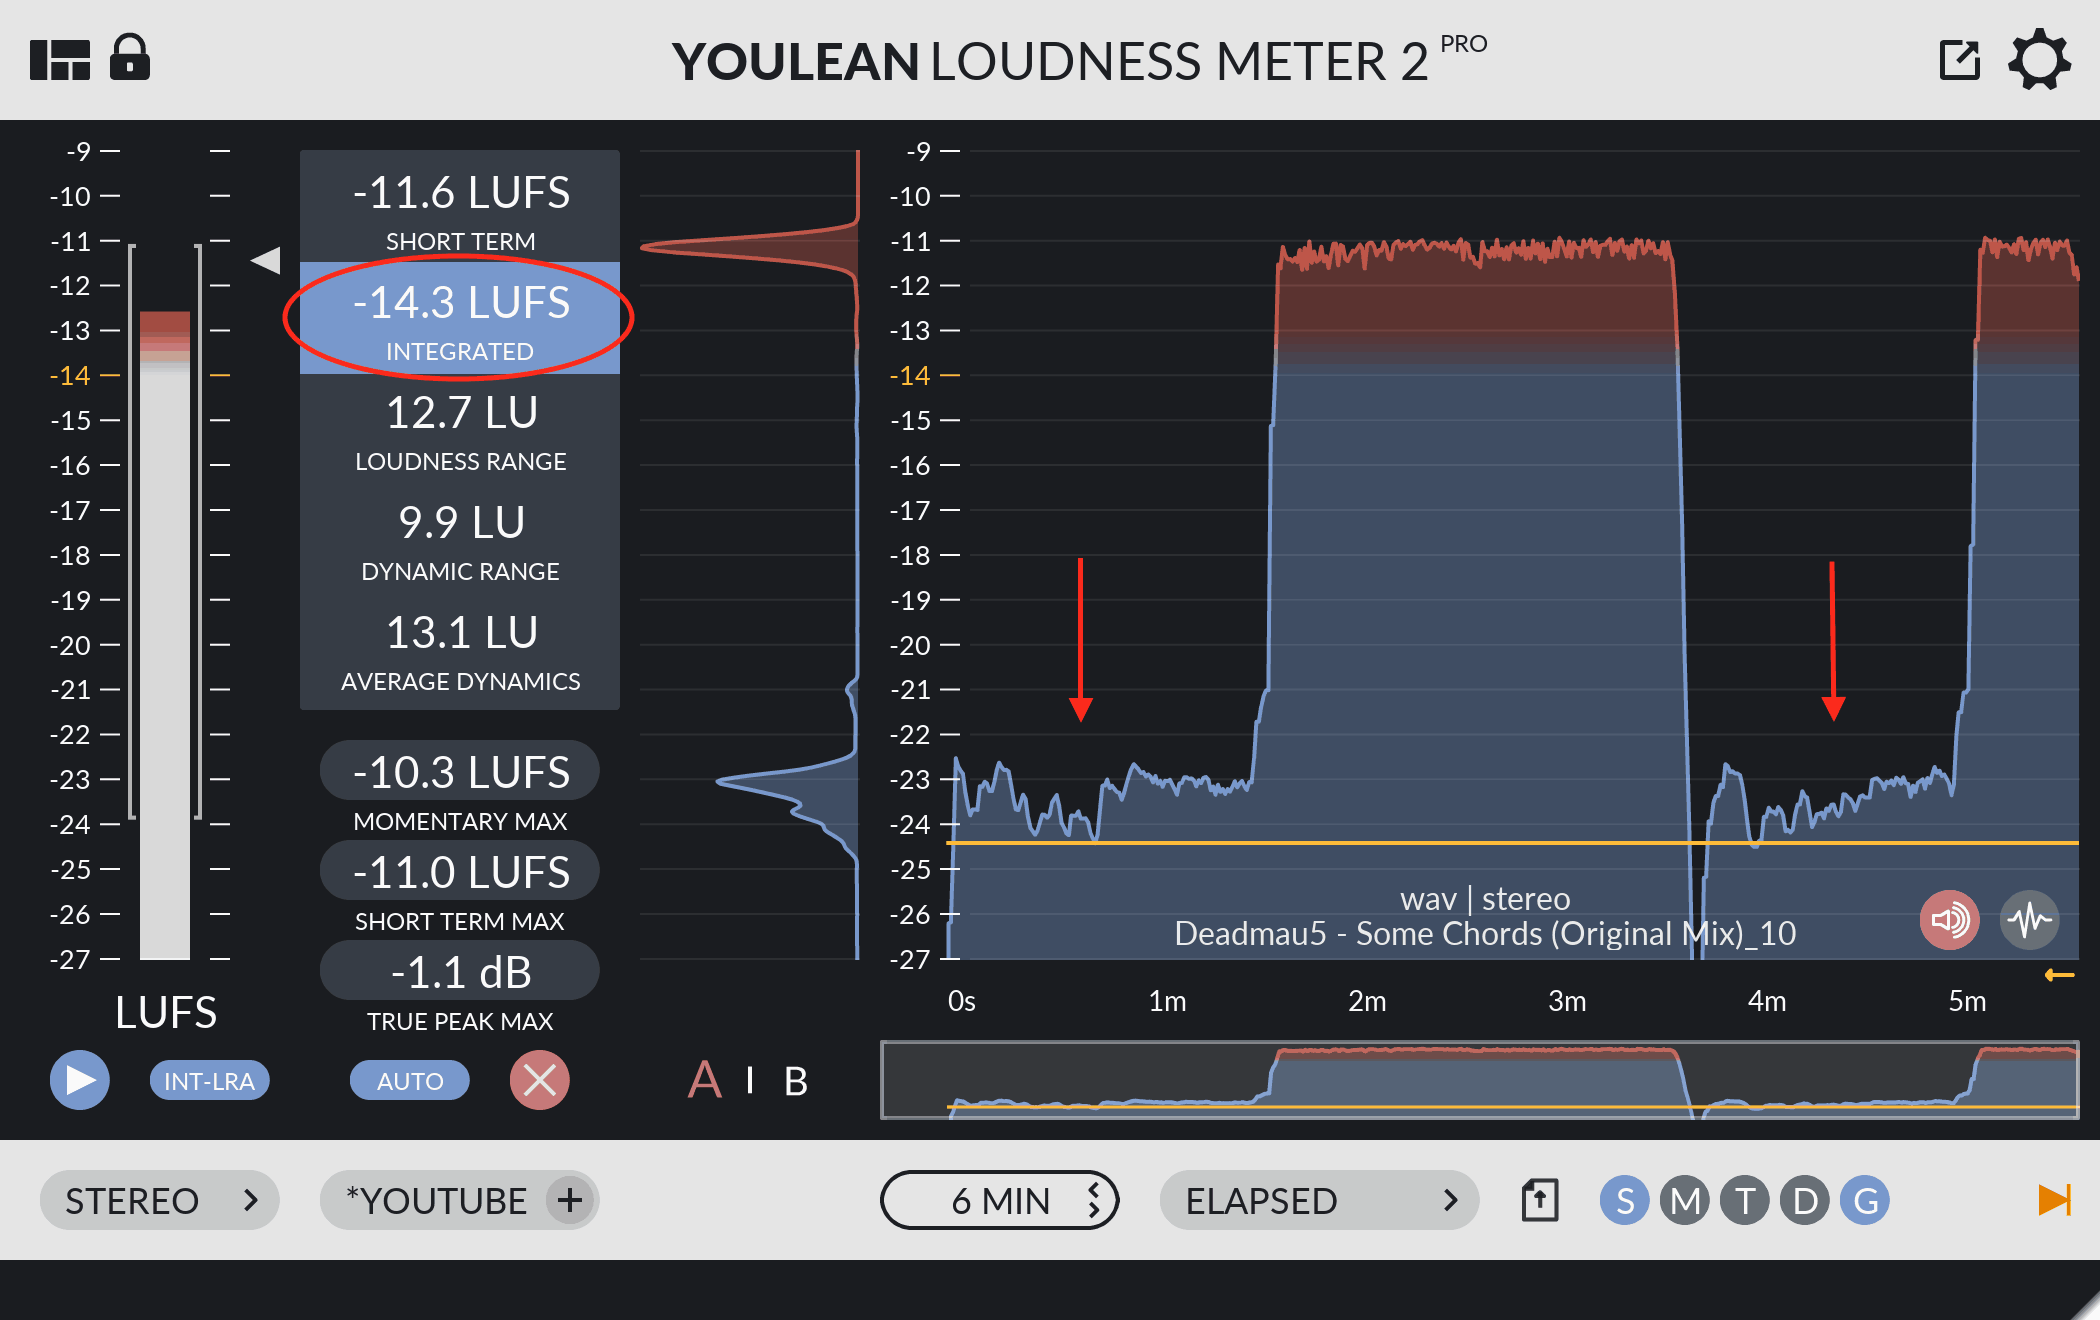
If we look at the loudness range, we will see that it went from 2.7 LU to 12.7 LU. That means that in an original song loudness difference between a chorus and the verse was just 2.7 LU, and now it is 12.7 LU which we can clearly see from this graph.
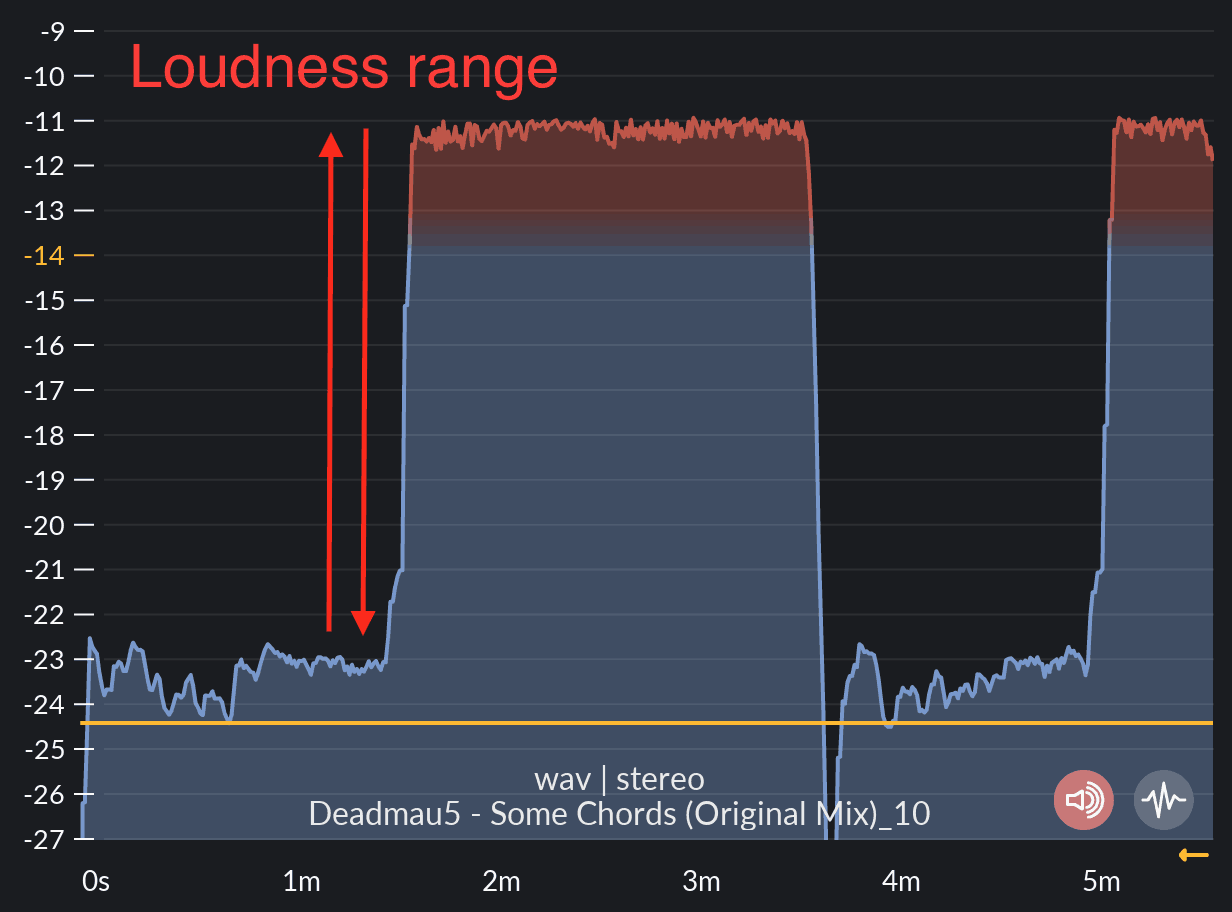
So, what have we achieved here actually?
Well, our song won’t be lowered in volume on YouTube anymore, thus this will make our chorus, or main part of the song 2 dB louder than the competition.
However, in this example, we destroyed the quieter parts of the song by making it too quiet.
This is not ideal of course.
One workaround for that would be to produce music in a way to give you less loudness in the verse parts but to sound fairly loud to us humans.
How to produce so we can have a lower loudness levels?
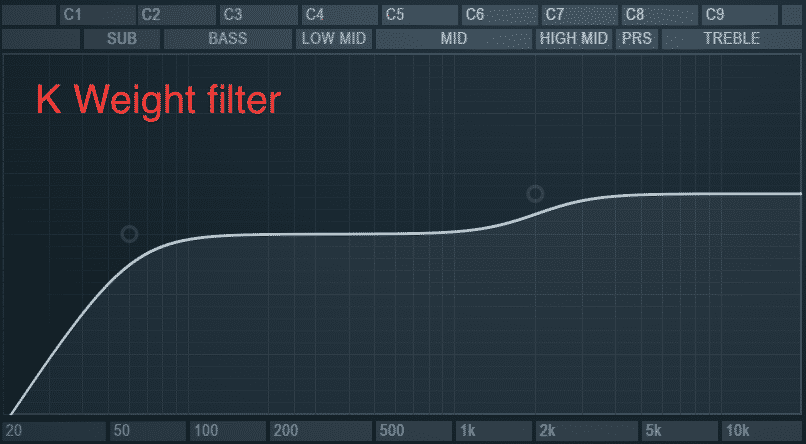
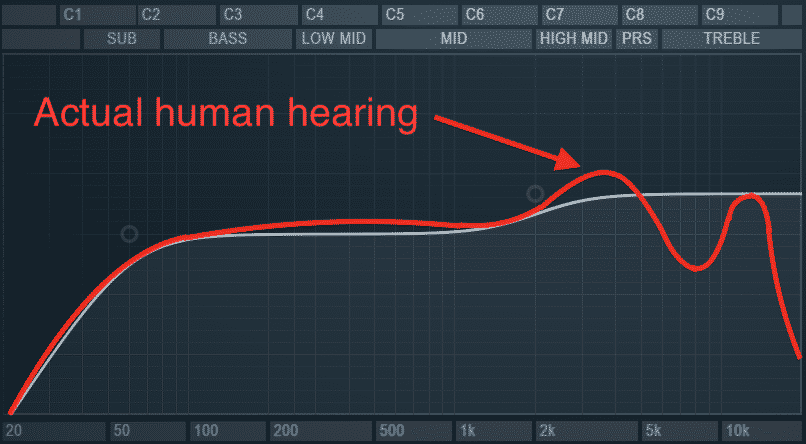
One part of the LUFS algorithm is the K Weight filter. That means that audio is filtered before determining how loud it is. This filter tries to mimic, but it does not exactly represent our hearing.
As we can see here in this K Weight filter visualization, 3 kHz or more will affect more the LUFS algorithm, and 80 Hz or less, will affect less the LUFS algorithm.
Playing sub-bass will much less affect the loudness compared to the high pitch tone for example.
Also, shorter audio tones will affect less loudness than the longer tones.
If we look at how different is K Weight filter compared to how we actually hear, we can see that filter represents our hearing really well, but there are some inconsistencies in the high end of the spectrum.
I think that this wasn’t a deal-breaker for the LUFS precision, but it did simplified filter a lot, thus making the algorithm less CPU hungry.
So if we want to take advantage of this to be quieter in LUFS, we should make sure not to have too much audio in 15 kHz and above since we can’t really hear that range very well. We should also avoid sounds from 4 kHz – 12 kHz since we can’t hear that sounds really well, but the algorithm is pronouncing that range.
Basically, if you want to fake lower LUFS levels, use parts of the spectrum where we are more sensitive than the K Weight filter.
Conclusion! Should I do this hack?
If you want to master your song using this technique, in order for your chorus to be louder than the others, you should not do this! This is because you will gain just 2 LUFS, but your quiet parts of the song will be too quiet.
If you, however, want to produce a song that will take this hack into an account, you could experiment. LUFS algorithm is great, but not perfect, and there is some room for hacking.
Anyway, it seems that the LUFS algorithm is really solid, so Loudness Wars 2.0 ain’t gonna happen anytime soon, so generally, this hack is not recommend.
I hope that you learned a thing or two about how LUFS works! If you have any question, write it down.

I do not like music where the chorus is played very loudly. It is better to be a balance and a good value for the volume throughout the song.
I do not understand why LUFS began to apply for individual music tracks. LUFS for music is perfect for a full album or a collection of different songs or streaming – you will not need to touch the volume if any track will play louder than the others.
When mixing a track better guided by your ears rather than LUFS indicators. If your music will sound louder than others, it does not mean that it will be better than those that are quieter.
Generally, chorus should be louder than the other parts of the song, and this is how most songs are produced, however it shouldn’t be too much louder. Also, there should be a balance in energy of the song and usually the last chorus is the loudest part of the song.
LUFS does apply to the albums too. It just depends on the streaming service how this is handled.
You should mix with ears of course, but meters do have important role in the mixing process. For example, using a loudness meter can help you to see the balance of loudness within the song.
But why are there still masters at -8 or even -6 uploaded on youtube? And yet they sound louder again compared to a -12 or -14 upload!
It shouldn’t sound louder if the normalization is turned on.
So the -14 LUFS on streaming services and YouTube is applied ONLY for those users who have turned the normalisation on? I was under the impression that its done on the backend for everyone.
I have never turned Normalisation & Sound Check ON on Spotify and Apple Music respectively. So I hear -5db masters as is?
You can’t turn off normalization for the Youtube, but on other services, you can, but that only affect you, and not the others. Of course, then the audio won’t be loudness normalized and you will hear it as it is.
John is totally right there are song that will be lowered 8 db (up to -5/6 lufs) and still sound louder and more dynamic than -9 or -10 mixes take skrillex ‘show tracks’ his tracks will show-6 on quieter parts and -3 on drops. So who’s right? I think whoever is louder is right. You should experiment with arguably loud mixes and see how they sound once normalized.
Hello thank you so much for the opportunity. we bought your product but honestly like many others we still don’t know how to get the most out of it. please if you could on simple video show us how to set in advance a Lufs value that our song should reach. or show how to analyze the song from start to finish, so you can see the entire song graph as in point 2. Find which part of the song we want to make quieter and how to do it
please give us the weapons, and we will be grateful to you, we will become more efficient and will be for you ambassadors to our colleagues.
thank you very much for your work. respectfully
Please watch this tutorial for now: https://youtu.be/ld11Be_ixzY
More explanations are coming in the future!
you are the real mvp Julijan!
Hahahha, Thanks! 😉
Theyre applying DRC (compressor) now, literally destroying the music.
So, we are scrubd. Thanks Youtube. ^^
Do you have any examples for this?